Wednesday, June 17, 2009

Gold Panning Tools and Equipment!

First things first... there are A LOT of different makes of different tools and specialty items in the prospecting world. There's a bunch of big names, and a whole bunch of little guy one off inventors.

There's not a lot of feedback on many products and there's certainly a lot of hype about others. I'm in no position to draw the line on what is good and what isn't simply because I haven't even seen all the products on the market with my own eyes. What i can do however is show you a list of whats available. Expect this list to grow and change in time.

Gold Panning and Prospecting Tools | Gold Pans!

its the #1 tool you can have. The funny thing about Gold pans is that you don't need an *actual* gold pan... you can use anything that holds water really. Some things work better than others. For instance an ice cream bucket will work a lot better than a rubber boot.

Metal gold pans are all but a thing of the past now... a shame really because they had more than one purpose. The old timers use to cook their meals in them! Among other useful traits they didn't tend to float down the river if you dropped it by accident. Metal pans like to sink! It seems the new fangled plastic pans are taking over but its not so bad. They have some awesome features that make them better than their metal predecessors. Plastic gold pans have bigger and sharper riffles as well as new shapes that where never possible with metal.

To date You've definitely got your options when it comes to gold pans. Here's some pictures to give you an idea!
I've personally used the Square pan made by LeTrap and find it to be a great tool for processing large amounts of material although it does lose small amounts of fine gold even with the proper technique. Other than that I'll stick to my generic round pan for sampling. Its mostly personal preference. I've also heard VERY good things about the Gold Rush Pro Gold Pan, and the Pyramid Pro Gold pan (bottom right and bottom left respectably) but have yet to try them.

Next on the list of Gold panning equipment and tools:


Gold Panning & Prospecting Equipment | Sluice boxes

for the average small time gold panner and prospector sluice boxes are very important for moving large amounts of material quickly. Also known as River robbers, long toms, and a host of other names they rely on a current of water (usually placed in the stream) to wash material over their riffles and catch mats. The amount and velocity of the water are key factors in determining fine gold recovery. They don't come cheap but its not difficult to make your own. DIY jobs usually don't last too long in the field, are too heavy and generally just don't live up the expectations one might assume with a branded commercial sluice box. Below are some commonly available ones

Proline sluices. Available in a multitude of lengths and configurations.
Keene Engineering Sluices. Same thing, many sizes and configs:

LeTrap Plastic Sluices:

And even Home made!


As you can see they all have the basic principles at work. See now why the homemade ones can be heavy? They can be light too, but unless you're working with specialty plastics like the LeTrap or aluminum like the Keene and Proline it just wont be very durable. The LeTrap is a GREAT sluice box for beginner prospectors and gold panners. Its super lightweight, pretty reasonably priced and despite how it looks and what its made of, has been known to grab A LOT of fine gold along with the bigger stuff that almost no sluice misses. A lot of research has gone into the commercially available sluice boxes and you generally get what you pay for. Check out Wikipedia if you're still hungry for info regarding how these beauties work.

Lastly for today:

Gold Panning and Prospecting Tools | Highbankers!

High bankers fill that gap between "small time prospector and gold panner" to "small to medium production mining outfit" Also known as Power sluices, Highbankers let you do your sluicing anywhere that you want and there are recirculating systems available that allow for limitless set up locations because you won't need a steady fresh supply of water. They generally don't come with pumps which can get pricey depending on your highbanker's size and water needs. Most Prospectors don't invest in this equipment until they have found a claim with proven output. These tools are designed for high production and not necessarily for high mobility or ease of set up.

Here's what they look like.


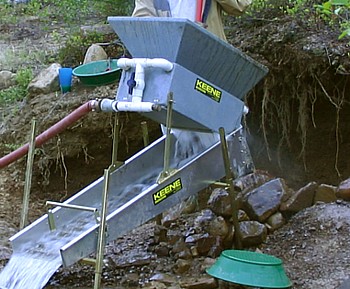
and last but definitely not least!

Its worth noting that the last image shown here with the LeTrap sluice can be set up quite cheaply and makes for a compact lightweight package. It can be even cheaper if your build the legs and stand yourself!! Every Gold Panner knows the best prospecting tool is a light prospecting tool!

That's enough for now.. next time I'll cover Dredges, Trommels, and Concentrate Clean up Equipment which should just about cover most of the prospecting tools and gold panning equipment.

Mosquito Itch remedies!!

If you're gold panning or prospecting insects and specifically mosquitoes can be a REALLY BIG PAIN in the butt! For instance I made a quick hike up a creek near my house yesterday and I am now covered with more than 17 bites. Hungry little buggers!!

Below are some good mosquito itch remedies that will help take the itch away and help heal up the wounds.
  • Rub white vinegar on the wounds when they they begin to itch. if its opened up at all the slight stinging sensation from the vinegar is a very welcome relief from the itching. It seems to numb the itching for a while too.
  • Antihistamines also work great to temporarily remove the itching of mosquito bites
  • Rubbing alcohol applied vigorously to the wound and then covered with a bandaid or - get this - scotch tape have been known to stop the itching and speed healing greatly!
  • Applying soap to the mosquito bit is said to provide instant relief. I haven't tried this though.

All those ideas work great, but the very best way to stop the itching is to not be bitten at all!!

Here's a small list of mosquito repellents that work good for me.
  • COVER UP!! exposed skin is a major target for these heat seeking bugs.
  • Apply DEET, the stronger the better... though its health effects on humans are still being argued.
  • Apply a slightly diluted spray of white vinegar to your body. They had the smell and hate the taste even worse! FYI, mosquito's don't much like B.O. either. The cleaner and nicer your clothes smell, the bigger the horde of mosquito's you'll have buzzing around you... go ahead... don't be afraid to stink it up a bit!... you are in the woods after all!
  • Garlic and citronella are known to be so-so repellents... they're all natural so its worth a shot anyway.
Hopefully you've got the info to prevent endless nights of sleeplessness cause by your incessant mosquito bite itching. Now go get some gold and quite worrying about those bugs!

UPDATE: A friend of mine just recently introduced me to this. As mentioned above antihistamines are a great way to stop the itching from a mosquito bite. The problem is that a lot of them make you kind of drowsy! There is now a roll on applicator made by Benadryl. POOF instant relief that lasts hours. It also helps heal the bite faster. It is my opinion that this is without a doubt the best remedy yet for treating mosquito bites!
Reblog this post [with Zemanta]

Tuesday, June 16, 2009

How to find Gold | Reading Streams

How to read a stream and where to find gold have given a lot beginner prospectors and recreational gold panners a hard time. Let's face it, it's not the easiest thing to find. There are a couple ways to go about finding gold and I'll share one method that works best for me!

So.. Where do you find gold?? Well, creeks, rivers, and water run off's are some of the best places! That's not to say that they are the only places though! There's ancient rivers that are long dried up now that are known to carry VAST amounts of very course gold... more on that in another post perhaps. For now lets focus on finding gold in rivers and creeks.
First things first. The rivers and creeks are not where the gold is coming from! They are where the gold collects! The water from spring run off, floods and landslides all wash gold into the stream bed for you to find later. The gold we find in streams are called "placer deposits". Placer gold is gold that's traveled from its original source - AKA the lode. The further the gold travels the more rounded and smaller the pieces become. With that in mind you can zero in on "new" course gold. If you're finding quartz stone mixed in or even attached to the gold you are very, very close to the source.

Some people like running around with a shovel and gold pan like a chicken with their head cut off! It's not the best method in my eyes, but it can be an adventure and it's not a boring systematic way of doing things. It's a "fly by the seat of your pants" way of doing it and if you've got the prior knowledge and some good intuition it can pay off! I think every newbie tries this once before getting frustrated with poor returns or hit and miss gold finds that don't make any sense.
If you really want to locate a pay streak, the best way is to do a grid system or at least keep it linear. Try the following and see if it works for you.
Find a section of a creek you believe to be gold bearing and look for the high water mark. The high water mark is a good indicator of where the water was during the spring flood season. Those spring floods load and shuffle the creek (hopefully) with gold.
Highlighted in red is where the high-water mark ends. Highlighted in blue is a good place to look for gold. There's lots of roots and it's on an inside bend just after the apex where the water tends to move slowest and even pool around the peninsula.
Once you've located the high water mark grab your shovel and gold pan, take a sample, pan it out and note how much black sand you've found. You can be a little quick and sloppy because we're only monitoring the black sand amounts for now. Continue in this fashion while working towards the center of the creek and taking samples ever foot or two. Note the black sands in each pan... how much... how little.. and where the most concentrations are.

Here you can see the path that gold and the heavier materials will follow along a stream.Once you have a rough idea where all the concentrations of black sand are grab your pan and shovel again. Go to the spot in the creek (or outside of it if the water is low) and begin panning the area closest to the center of the creek where the black sand levels began to drop significantly.
If the creek is an active gold bearing creek this will be your most likely spot for a pay streak! Continue sampling with your gold pan, and if thing are beginning to look good it's time to move in the heavier equipment like a sluice box where permitted.

If you're not finding much or anything in that spot move down or upstream to another spot and repeat the process. Several factors might be causing the gold not to collect there. For instance there could be a slow spot in the creek up stream where the water loses its momentum and most of the gold gets deposited there! It's also possible that in the spot you checked the water was moving too fast, however if that is the case there should be very little black sand present.
...And remember the old saying: "Gold is where you find it"! It's worth mentioning though that it's best to start looking in areas where other people have found it before!!
Reblog this post [with Zemanta]

Monday, June 15, 2009

How to Gold Pan

So here you are! probably a first timer if you're reading this, or maybe you're just unsure of your technique and needing some reinforcement. Whatever the case this guide should set you straight on how to gold pan. If you've found gold on your own you've probably got the bug, but to help you nourish and feed that bug into a full blown gold fever there's some things you should know about your trusty pan! As mentioned in my first post you're going to want to break your gold pan in so you're not shooting yourself in the foot right out of the gate. It doesn't hurt to practice in your backyard with some led pellets or BB's and dirt you have lying around. In fact it can save you a lot of time since you won't be missing gold all over the place out in the field! This way you know what to look for and you can get a really good idea if you're doing the actions properly.

Step 1:
So gold pan in hand and a stream or bin of water nearby you're going to want to get some dirt in that pan of yours. Classify the Dirt into 1/4" or less. Lets assume for now we won't be finding any 1/4" nuggets!

Step 2: Once you've got your dirt classified and your pan filled 3/4's full, submerge it and mix water in with it. This agitation sinks the gold to the bottom.

Step 3:
Now the panning starts! pull the pan up so it's just level with the water and shake it back and forth, side to side, and twist it. This again helps all the gold settle to the bottom.

Step 4: To remove the lighter materials from the gold pan, you're going to want to tip the edge with the riffles into the water.While keeping that end submersed in the water you're going to begin doing circular or oval motions using the entire length of your arms from your shoulders down. This is one recreational activity that isn't all in the wrist! After a couple swirls around you should be noticing the top layer of lighter materials kind of sloughing or washing off... That's good, but get too carried away and you're going to start washing away gold too! In my experience most of the fine gold never settles to the bottom on the first try so remember to shake it often. The riffles or ledges on the inside of the gold pan the are designed to catch the gold and heavier materials while allowing the lighter stuff to wash over and out. Continue in this fashion until you get down to just the heavy materials like the picture below.
Step 5: What you should have now is what's called black sand concentrates. It will be a bit of black sand, a bit of the blond sands that were too stubborn to leave the pan, and with a little luck you'll have some gold!! (or your bb's). That black sand you're seeing is a mixture of Magnetite and iron. Its heavy stuff and it seems to be almost everywhere in trace amounts. If there's none left in your pan you're probably panning to hard and fast. Slow it down and make sure to shake it every so often!

Step 6: Clean up! My best suggestion is to dump whats left in your pan into a small container to take home. Clean up will be more comfortable and you'll have better control over the environment. All that means is that you're less likely to lose any precious gold. If you do decide to separate the gold from the black sands in the field, use a catch basin so you're not accidentally losing anything as it can be very tricky to separate the gold from the black sand.

Stay posted for How to use the New Square pans everyone is raving about, as well as an older type of gold pan that is making a comeback. The Grizzly! It's great for quick processing and there is a new one on the market with a lifetime warranty. If you're got any info you think might help improve this site, please let me know! Better yet!, if you think you want to write a how to of your own, share a story or have anything to share at all please feel free to leave a comment with your contact info! Hope you enjoyed this breif guide on How to gold pan.


Reblog this post [with Zemanta]

Saturday, June 13, 2009

A quick story before the Gold Panning lessons begin!

Last summer I had a very close call while out gold panning. It really reminded me that it's not safe to go out alone unless you're well prepared to deal with any dangers that might arise. So a word of caution to all you would be prospectors and gold panners out there!... BE SAFE, because if you get stuck out in the boonies by yourself, the odds of finding help are pretty slim.

Anyhow, here's what happened. My friend, his wife, and I where working at a local spot I like to visit. I was digging into a bank where I seemed to be finding bigger and bigger pieces of gold the further into it I dug. My two friends where standing in the creek having fun practicing their gold panning technique when my one friends, John, looks up to tell me something. The problem is what he was going to tell me wasn't at all what he had planned on saying. All he could mumble out was B-b-b-b-BEAR!!! Not believing my friend since he had been joking around about that all day (a really bad idea!) I was slow to react and look up. As I lifted my head above the lip of the bank... there it was... a big ol black bear staring me right in the eyes from about 10 - 15 feet away. Pick axe in hand I backed up slowly and told my friends to climb on the big rock in the middle of the creek. I slowly made my way to them and stood there remembering that its best to group together and make yourselves look big when approached by a black bear. Luckily this one had no cubs and was actually very docile! It kind of looked at us for a period of time then went about its business shaking trees and eating leaves. It stuck around for 10 minutes or so pretending to be our pal before moseying on down the creek. I named him Joe the Bear.

And without further delay: How To Gold Pan and Gold Panning Lessons


It was a surreal experience! But a good lesson for anyone who frequents the outdoors... Be prepared and make sure all your food is in SEALED containers!


Gold Pan Break in!

This being the inaugural post in my brand new blog, I thought I'd start things out simple! The first tip I will reveal might seem small and insignificant, but if you're new to gold panning it can be a really important one!

First things first!! The snow from winter is all but melted, spring went ahead and sprang, and now summer is approaching. Gold Panning season is nearly underway! Here in the Okanagan, and much like the rest of B.C. the rivers & creeks have been quite high due to the heavier than expected snow fall. That means more water pushing more dirt and washing more glorious yellow gold down the stream for you and I to discover.

Now when I first started panning I shudder to think of all the gold I missed out on because of this! I use and always have used the new type of pans that are made of high strength plastics (Garret Super Sluice 14" is my favorite). The biggest problem with these pans that most people don't realize is that in the plastic molding process the pans get sprayed with an oil so they don't stick to the mold. Even the oil from your hands can have a similar effect! That oil doesn't come off easy and it can cost you a lot of small "flour" gold.
Whats the harm in losing small microscopic bits of gold? well since the gold rush ended so many decades ago, that's most of what you'll be finding. The smallest bits of gold can be an indicator that you're beginning to look in the right place. If you miss that, you might miss out on a bigger cache or sweet spot.

So, to make sure your gold pan is properly broken in and ready for the start of another fun filled season, its important that you find some kind of de-greaser soap... anything that will take that mold oil off. But wait, you're not done there! You further improve your ability to find gold in your pan by taking some sand / sand paper / anything gritty and roughing up the pan a little bit. It really helps to slow the gold down and seperate it from the other lighter particles. Just be careful not to create any burs or extrustions on the surface, the goal here is flat and smooth but still textured.
Reblog this post [with Zemanta]